Halloween is the perfect time to showcase your creativity and style, especially when it comes to your nails! If you have short nails, don’t worry—you can still rock some adorable designs that will capture the spirit of the holiday. Here are some cute Halloween nail designs for short nails that will have you feeling festive in no time.
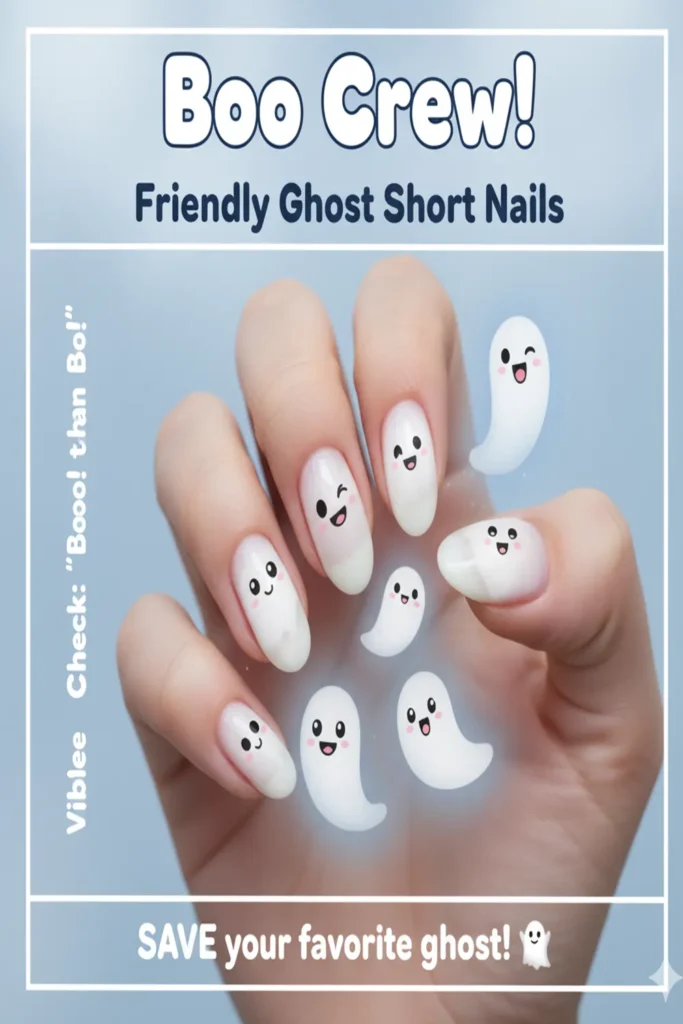
Whimsical Ghosts
One of the most classic Halloween motifs is the ghost. To create this cute look on your short nails, follow these simple steps:
- Start with a white base coat for a clean canvas.
- Using a micro brush or a dotting tool, paint tiny black eyes and a mouth on your white nails to create a ghostly face.
- For added flair, you can use sparkly top coat to give your ghosts a shimmering effect, making them stand out.
This design is fun, easy, and perfect for showing your Halloween spirit!
Spooky Spider Webs
Spider webs are another spooky classic that can be made cute! To achieve this design:
- Paint your nails with a light base color, such as pale orange or soft purple.
- Use a thin nail art brush to create the web pattern with black or dark purple polish.
- Add a tiny spider charm or paint a small spider on one or two nails for an extra touch.
This look is perfect for those who want to keep it spooky yet stylish!
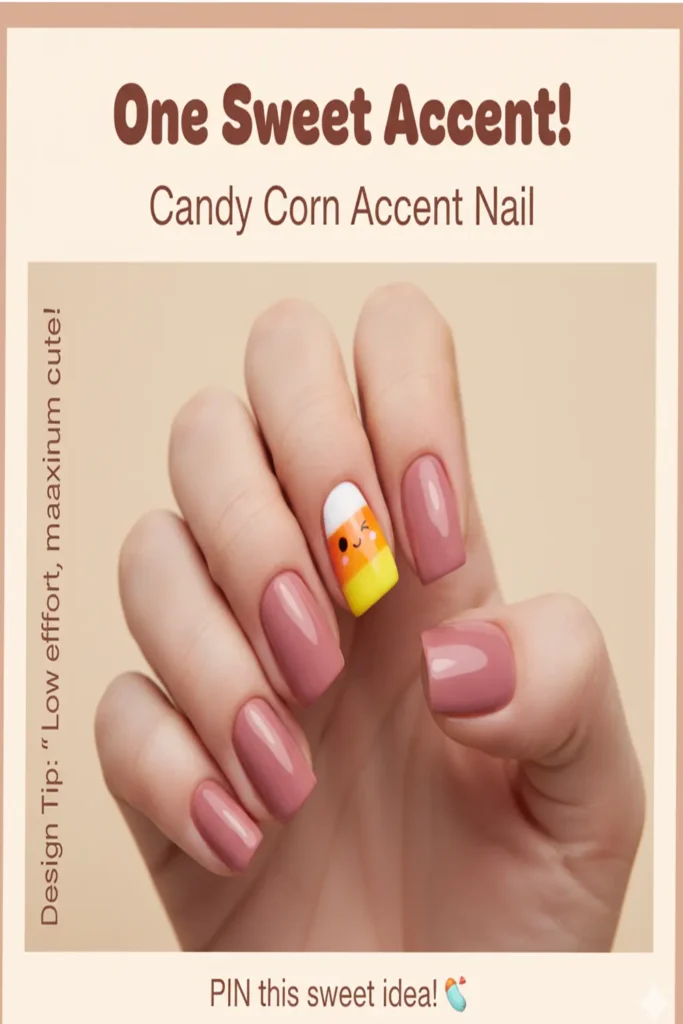
Candy Corn Delight
Candy corn is a candy we all associate with Halloween. Why not bring that sweet treat to your nails? Here’s how:
- Start with a clear or nude base coat.
- Divide your nail into three sections (bottom, middle, top) using tape.
- Paint the bottom third yellow, the middle third orange, and the top third white.
- Remove the tape carefully for a clean, stylish candy corn look.
This design is bright, colorful, and downright adorable!
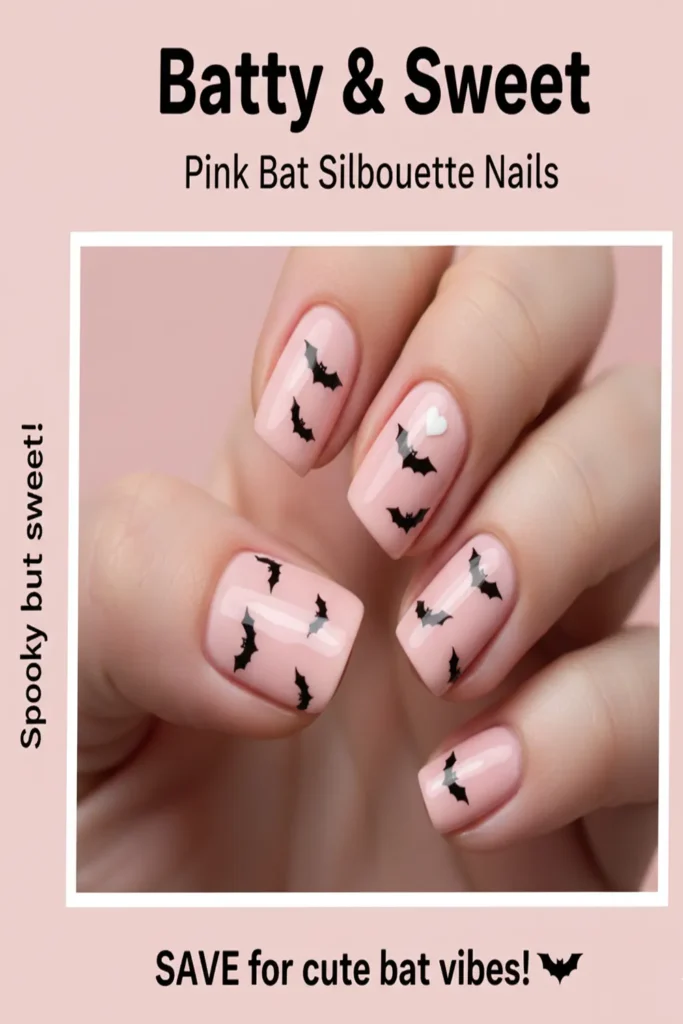
Batty for Bats
Bats are a staple in Halloween decor and can make for a cute nail design. To create batty nails:
- Choose a base color like deep blue or black.
- Once dry, use white polish or nail art pens to draw bat silhouettes or use bat stickers for an easier option.
- For added creativity, consider painting one nail a spooky moon color—like yellow or silver.
This look is simple yet makes a bold statement!
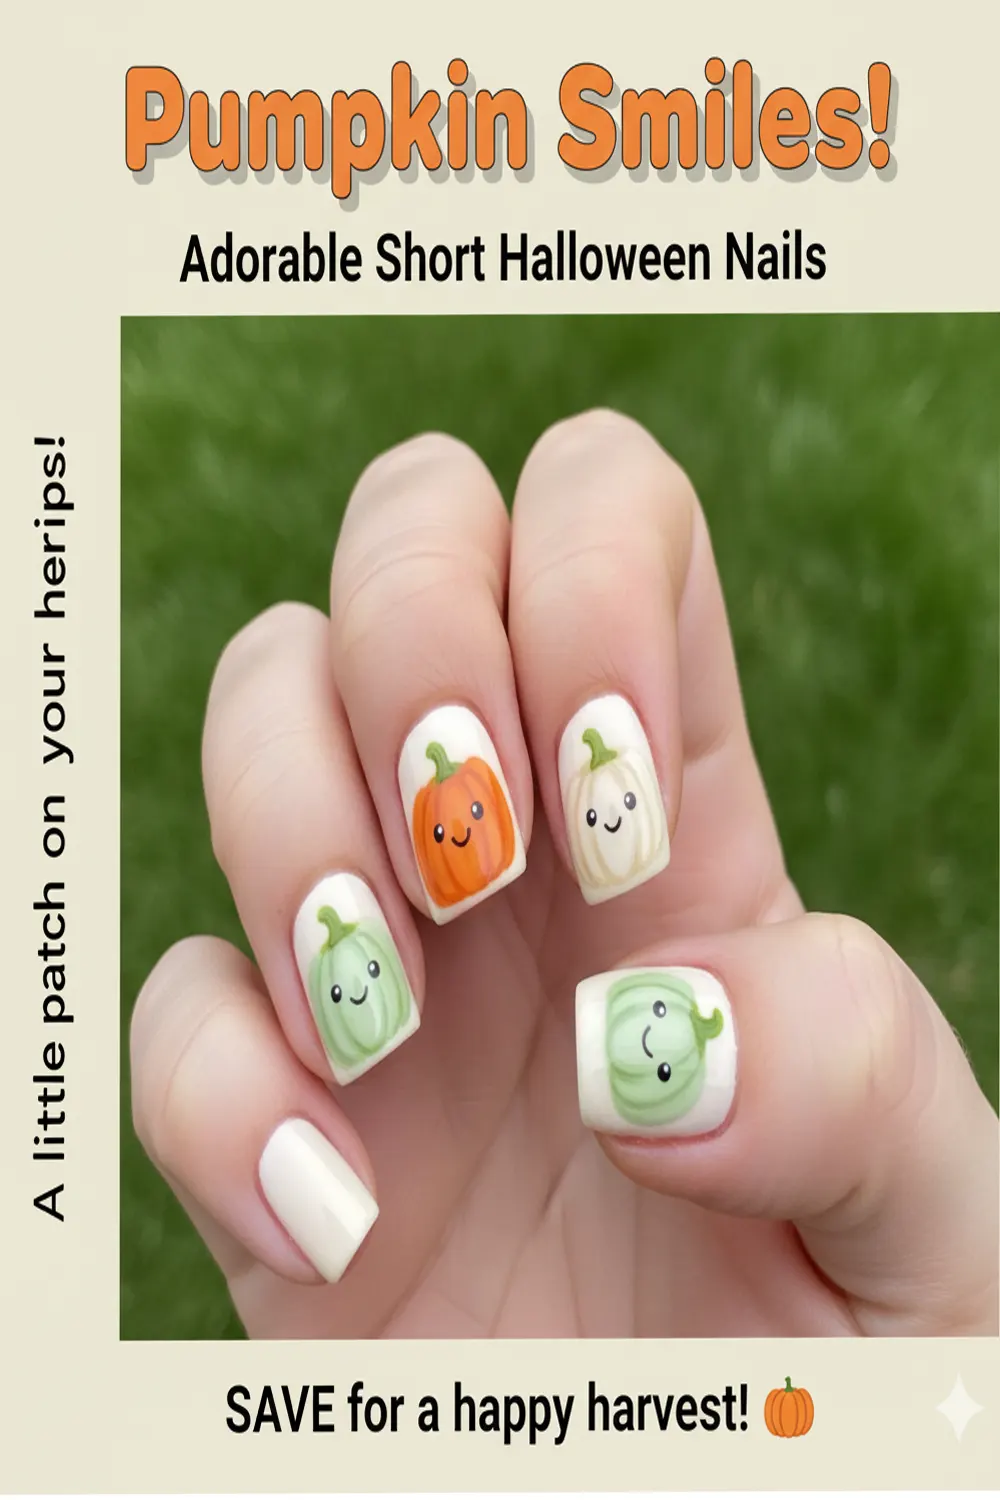
Pumpkin Punch
Pumpkins are essential in Halloween celebrations, so why not paint them on your nails? Here’s how to get this charming look:
- Apply an orange base coat to represent the pumpkin.
- Use green polish for the leaves and stem at the top of the pumpkins.
- Add detail with black polish for little faces, making them playful or scary depending on your preference.
This whimsical design will show your fun side this spooky season!
Using Nail Art Tools
Having the right tools can make all the difference. Here are a few must-have nail art tools for creating cute Halloween designs:
| Tool | Purpose |
|---|---|
| Nail Art Brushes | Perfect for detailed designs like webs and faces. |
| Dotting Tools | Great for creating polka dots or small patterns. |
| Nail Tape | Helps create clean lines for designs like candy corn. |
With these cute Halloween nail designs for short nails, you’ll be ready to celebrate the spooky season in style. Don’t forget to check out websites like Nail Art Unicorn and Nail Design Code for more inspiration and tips. Have a fang-tastic Halloween!
Best Color Combinations for Festive Nails
When it comes to festive nails, the joy of expressing yourself through color combinations can be quite delightful. Picking the right shades can elevate your look, whether it’s for Halloween, Christmas, or any other festive occasion. Below are some of the best color combinations that will make your nails stand out, ensuring you receive compliments all season long.
Classic Halloween Vibes
For Halloween, capture the spirit of the season with rich colors traditionally associated with this festive time. Consider the following combinations:
- Black and Orange: This iconic duo screams Halloween. Use an orange base with black tips for a chic look.
- Purple and Silver: A deep purple combined with silver sparkles can give you a mystical vibe. This combination is perfect if you’re going for a witch-inspired theme.
- Green and Gold: Bright green, reminiscent of slime or monsters, paired with gold can create a glamorous Halloween look.
Chic Winter Wonderland
As the holiday season approaches, embrace the colors that evoke warmth and joy. Here are some fabulous options:
- Red and White: Classic and elegant, red nails with white snowflakes or stripes add a festive touch.
- Metallic Gold and Burgundy: A rich burgundy is complemented beautifully by a shimmering gold, perfect for holiday parties.
- Teal and Silver: A refreshing take, a teal base with silver accents can evoke icy winter vibes and is perfect for a modern festive look.
Spring Celebrations
In spring, pastel colors reign supreme, making for soft and feminine nail art designs. Some great combinations include:
- Pale Pink and Mint Green: This sweet duo feels fresh and playful, ideal for Easter celebrations.
- Lavender and Lemon Yellow: A light lavender with cheerful lemon yellow brings Spring flowers to mind.
- Light Blue and Coral: Combining a soft blue base with bright coral tips gives a flirty and fun look.
Summer Fun
To truly shine during summer festivities, vibrant colors should be at the forefront of your style. Consider these combinations:
- Coral and Aqua: Bright and lively, a coral color paired with a cool aqua can mirror the beach vibe perfectly.
- Sunshine Yellow and Hot Pink: These two vibrant colors bring energy and radiance, perfect for summer parties.
- Neon Green and Purple: If you want to make a bold statement, this energetic duo can create an eye-catching look.
Color Combinations for Nail Art Designs
Sometimes, combining colors leads to stunning nail art designs. Explore the following options:
| Base Color | Accent Color | Design Idea |
|---|---|---|
| Black | Gold | Geometric patterns or stripes for a modern look |
| White | Light Blue | Cloud or wave designs for a whimsical touch |
| Pink | White | Floral designs or polka dots for a cute finish |
Where to Find Inspiration
Looking for more ideas and inspiration? Websites like Nail Art Designs or Instagram Nail Art showcase endless possibilities that can spark your creativity.
With these suggestions, you can ensure your festive nails are nothing short of perfect! Remember, nail art is all about having fun and expressing your individuality. Whether you opt for a subtle look or a bold statement, picking the right color combinations can elevate your festive celebrations.
Nail Art Techniques Perfect for Beginners
Nail art can be an exciting and creative way to express yourself, and it doesn’t have to be complicated! If you’re just starting out, there are plenty of simple techniques you can use to create beautiful designs on your nails. Here are some beginner-friendly nail art techniques that will help you get started and unleash your creativity.
Dotting Technique
One of the easiest ways to start your nail art journey is by using the dotting technique. All you need is a dotting tool or even a toothpick. You can create dots of different sizes and colors for a fun and playful look. Here’s how to do it:
- Choose your base color and apply it to your nails.
- Once dry, dip your dotting tool in a contrasting polish.
- Gently press the tool onto your nail to create dots.
- Experiment with different colors and sizes for variety.
This technique is great for polka dots, flowers, or even intricate patterns. For more inspiration, check out Nail Art Gallery.
Striping Tape Technique
Striping tape is a fantastic tool for beginners looking to create clean lines and geometric designs. It’s easy to use and can elevate your nail art in no time. Here’s how you can utilize striping tape:
- Paint your nails with a base color and let it dry.
- Apply strips of tape in any pattern you like.
- Paint over the tape with a second color.
- Carefully peel off the tape to reveal clean lines.
Using this technique, you can create stripes, chevrons, or even checkerboard patterns. For tips and more designs, visit Hello Nail Head.
Sponge Ombre Technique
The sponge ombre technique is perfect for those who want to create a beautiful gradient effect on their nails. Here’s how you can do it:
- Select two or three nail polish colors that blend well together.
- On a makeup sponge, apply a stripe of each color side by side.
- Gently dab the sponge onto your nail, pressing down to blend the colors.
- Repeat until you achieve your desired intensity.
This method creates a stunning effect that is perfect for events or daily wear. To learn more about ombre designs, check out My Polished Nails.
Stamping Technique
Stamping allows you to transfer intricate designs onto your nails with minimal effort. A stamping kit typically includes plates, a scraper, and a stamp. Here’s a quick guide to get you started:
- Paint your nails with the base color and let it dry.
- Apply nail polish to the design plate and scrape off the excess.
- Press the stamp onto the plate to pick up the design.
- Then, stamp it onto your nail.
This technique can transform your nails in seconds! For more stamping techniques, be sure to check Love for Nails.
Freehand Nail Art
If you’re feeling bold, try your hand at freehand nail art. This technique involves painting directly on your nails without any tools. Here are some steps to guide you:
- Start with a clean canvas and apply a base coat.
- Choose your favorite colors.
- Use a fine brush or the nail polish brush to create designs.
- Don’t worry about being perfect—embrace your imperfections!
This technique allows for the greatest creativity and originality. To see varied examples of freehand designs, visit Nails Magazine.
With these five nail art techniques, you’re well on your way to creating stunning designs! Remember, the key is to practice and have fun. Nail art is a wonderful way to express yourself, so don’t hesitate to experiment with colors and designs. Happy painting!
How to Choose Halloween Nail Themes
Choosing a Halloween nail theme can be an exciting way to express your creativity while getting into the spooky spirit of the holiday. With so many options out there, you might wonder how to narrow it down. Here are some key considerations to help you select the perfect theme for your Halloween nails.
Consider Your Personal Style
Your personal style should be the first consideration when selecting a Halloween nail theme. Are you drawn to bold colors and intricate designs, or do you prefer something more minimalist? Here are a few styles to consider:
- Classic Halloween: Think oranges, blacks, and purples with designs that include pumpkins, bats, and ghosts.
- Gothic Elegance: Dark shades like deep plum or black with subtle, intricate details such as lace or spider webs.
- Whimsical Fun: Bright colors and playful designs, featuring cartoonish characters like friendly ghosts or cute monsters.
Choose a Color Palette
The color palette is crucial in setting the tone for your Halloween nails. Consider combining traditional Halloween colors—like orange and black—with unexpected hues for a unique twist. Here’s a simple table that showcases popular Halloween colors:
| Color | Hex Code |
|---|---|
| Pumpkin Orange | #FF7518 |
| Midnight Black | #000000 |
| Blood Red | #BF0B0B |
| Ghostly White | #FFFFFF |
| Violet Purple | #6F32C2 |
Look for Inspiration
Finding inspiration for Halloween nail themes can come from various sources. Here are some avenues to explore:
- Social Media: Platforms like Instagram and Pinterest are treasure troves for nail designs. Use hashtags like #HalloweenNails to see trendy ideas.
- Nail Art Blogs: Blogs dedicated to nail art often have seasonal posts featuring Halloween designs. A great example is Nail Art Designs for tips and tricks.
- DIY Tutorials: YouTube and TikTok offer a host of DIY nail art tutorials that can guide you in creating your Halloween masterpiece.
Think About the Occasion
Consider where you’ll be showcasing your nails. If you’re attending a costume party, your nail design might complement your outfit. If you’re going for a more casual celebration, aim for something simple but cute. Here are some thematic ideas:
- Costume Parties: Match your nails to your costume for a cohesive look.
- Family Gatherings: Opt for cuter designs that appeal to kids, like cartoon pumpkins or friendly ghosts.
- Office Celebrations: Subtle, professional designs featuring soft colors and small details may be more appropriate.
Don’t Forget About Length
The length of your nails can significantly affect your overall design. Short nails can still be adorned beautifully for Halloween. Here are some options suitable for short nails:
- Accent Nails: Choose one or two nails to feature more detailed designs, while keeping the other nails simpler.
- Simple Patterns: Basic polka dots, stripes, or gradients can be charming without overwhelming shorter nails.
- Mini Art: Tiny pumpkins, bats, or candy corn can fit nicely on a short nail without looking cramped.
Finish with Style
Finishing touches will enhance your Halloween nails. A high-quality top coat not only adds shine but also protects your design. Make sure to choose festive nail stickers or decals that can layer easily on your chosen theme.
By carefully considering your personal style, color choices, and the occasion, you can create Halloween nails that are not only cute but truly reflect your festive spirit. Whether you opt for short nails or long, there are countless options to make your Halloween nail design stand out!
Maintenance Tips for Short Halloween Nails
Halloween is the perfect time to express your creativity, and your nails are an excellent canvas. If you’re sporting short Halloween nails, keeping them looking cute and festive requires a bit of maintenance. Here are some essential tips to help you maintain beautiful short nails throughout this spooky season.
Regular Trimming and Shaping
Short nails are easier to manage, but they still need regular attention. Aim to trim your nails every couple of weeks to keep them neat. Here’s how to do it right:
- Use sharp nail clippers for clean cuts.
- File the edges to avoid snags, shaping them into your desired style.
- Opt for a rounded or square shape that complements your fingers.
Moisturizing is Key
Short nails can look dull if they’re not well-moisturized. Hydration is essential for keeping your nails and cuticles healthy. Make it a habit to apply cuticle oil or a nourishing hand cream daily. Here are some tips:
- Apply cuticle oil after every nail polish removal.
- Use a thick hand cream before bedtime for overnight hydration.
- Look for products with ingredients like jojoba oil or vitamin E, which are great for nails.
Selecting the Right Nail Polish
When it comes to short Halloween nails, the right nail polish can elevate your look. Choose vibrant colors and fun designs that scream Halloween spirit while working well with a shorter nail length:
- Bold shades like orange, black, and purple.
- Fun designs such as pumpkins, ghosts, and spider webs, using nail art pens or stickers.
- Consider using gel polish for longevity; it typically lasts longer than regular polish.
Effective Application Techniques
Application matters, especially on short nails. To achieve a polished look, follow these steps:
- Always start with a base coat to protect your nails.
- Apply your chosen color in thin layers for an even finish.
- Seal with a topcoat to ensure shine and protect your design.
Additionally, avoid thick layers of polish, as they can lead to chipping. Instead, multiple thin layers give a smoother and more even appearance.
Maintain Nail Health
In the excitement of Halloween, it’s easy to overlook your nail health. Yet, keeping your nails healthy is essential to maintaining their beauty. Follow these tips for optimal nail care:
- Limit exposure to water and harsh chemicals. Wear gloves while cleaning.
- Stay hydrated by drinking plenty of water; this can improve nail strength.
- Consider taking biotin supplements to promote nail growth and health.
Tool Care and Hygienic Practices
Ensuring that your manicure tools are clean can help prevent infections and maintain nail health. Here’s what you should do:
- Regularly sanitize your nail clippers, files, and brushes.
- Store your tools in a clean, dry place to avoid contamination.
- Replace any tools that show signs of wear and tear to ensure safety.
Fun Short Nail Designs for Halloween
Looking for design inspiration? Here are some cute and easy nail designs perfect for short Halloween nails:
| Design | Description |
|---|---|
| Ghosts | Use white polish with black dots for eyes to create cute ghosts. |
| Pumpkin Faces | Paint orange nails and draw various pumpkin faces using a black nail art pen. |
| Spider Webs | Utilize a black background and a white striper brush for striking web designs. |
With these maintenance tips and design ideas, you can keep your short Halloween nails looking cute and festive. Remember, the key is to keep them healthy while expressing your creativity. For more inspiration and nail art techniques, visit sites like NailPro and Get Nail Art.
Enjoy the spooky season with nails that show off your personality while remaining manageable and stylish!
Key Takeaway:
When it comes to celebrating Halloween, having cute Halloween nails can add an extra touch of festivity to your overall look. This article highlights various essential topics to help you achieve adorable short Halloween nails that stand out.
First, we explored a variety of cute Halloween nail designs specifically for short nails. Popular themes include playful pumpkins, spooky ghosts, and vibrant spider webs, all of which can be applied easily to shorter nails. Using small accessories—like nail decals or stickers—can also enhance your designs without requiring extensive nail length.
In terms of color combinations, the article emphasizes the classic Halloween palette of blacks, oranges, purples, and greens. Mixing these colors can lead to striking visual effects. For instance, a classic orange base with black tips or purple and green ombre can make your short Halloween nails pop, ensuring they look festive and fun.
We also delved into nail art techniques that are perfect for beginners. Simple methods such as dotting, striping, and sponge application can easily bring your Halloween nail designs to life without requiring professional skills. These techniques allow you to become creative with your nail art while keeping it straightforward and achievable.
The process of choosing a Halloween nail theme is equally crucial. It’s essential to align your nail designs with your personal style, whether you prefer something cute and whimsical or something a bit darker and more spooky. You can consider elements from your favorite Halloween costumes or decorations for inspiration, which ensures your nails reflect your unique personality during the holiday season.
Maintaining your short Halloween nails is vital for keeping them looking fresh and vibrant. Regular touch-ups, the use of a good topcoat, and avoiding excessive exposure to water can help prolong your designs. Taking the time to care for your nails not only makes for a great appearance but also boosts your overall confidence as you show off your spooky manicure.
By combining these key aspects, you can achieve adorable short Halloween nails that truly capture the spirit of the season, ensuring you look fabulous and festive for all your Halloween events.
Conclusion
Embracing the spirit of Halloween with cute nail designs for short nails is both fun and creative. By exploring various designs, you have a world of seasonal inspiration at your fingertips. You can experiment with color combinations like classic orange and black or playful pastels that add a festive charm to your look. With the right nail art techniques suited for beginners, like polka dots or simple ghost designs, you can easily achieve a professional-looking finish at home.
Choosing the perfect theme can elevate your Halloween nails even further. Whether you want to embody spooky vibes or opt for cheerful images of pumpkins and candy, there’s something for every taste. Staying organized and planning your nail art ahead ensures you capture the essence of the season while expressing your individuality.
Don’t forget that maintaining your short Halloween nails is just as important as the design itself. Regular care, including moisturizing your cuticles and applying a top coat, can keep your nails looking fresh and festive throughout the holiday. By following these guidelines and tips, you can enjoy beautiful, eye-catching Halloween nails that not only reflect the holiday spirit but also bring joy and creativity to your everyday life. Dive into the fun and allow your nails to be a canvas that showcases the whimsy of Halloween!