Halloween is the perfect time to show off your creativity, especially when it comes to your nails. This year, acrylic Halloween nails ideas can elevate your spooky game. From intricate designs to fun themes, let’s explore some trendy options that will make your nails the highlight of the night.
Bold and Spooky Nail Art
If you’re looking to make a statement, consider bold designs that scream Halloween. Here are a few exciting options:
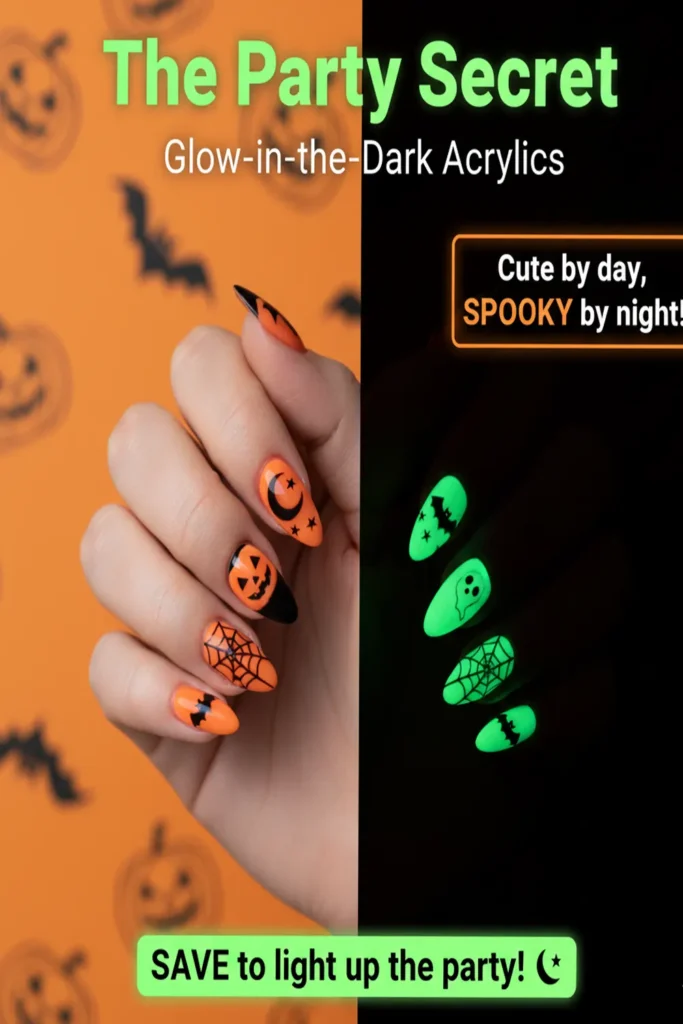
- Ghostly Glow: Use a glow-in-the-dark acrylic base with tiny ghost carvings. Add eyes that pop when the lights are out!
- Spider Web Chic: A black base with silver lines can create a spooky spider web. Finish with a small acrylic spider for an extra touch of fright.
- Pumpkin Spice: Bright orange nails with jack-o’-lantern faces will never go out of style. Mix it with some glitter for added glamour.
Nature-Inspired Designs
Get inspired by the autumn season with nature-themed designs. Some ideas are:
- Fallen Leaves: Use warm colors like red, yellow, and brown, and paint delicate leaf patterns. This captures the spirit of fall.
- Night Sky: A deep blue or black base with white dots arranged in constellations can set the perfect backdrop for Halloween.
Character Nail Art
Showcase your favorite Halloween characters. Here are some playful character-inspired ideas:
- Witchy Vibes: Paint your nails dark purple with tipped black accents. Add tiny witch hats or stars for flair.
- Vampire Kiss: A bright red base with fangs painted on the tips will add a classy yet eerie touch.
Fun Patterns and Textures
Textures and patterns can elevate your nail game. Here are a few to consider:
- Glitter Bomb: Overlay your acrylic nails with different colors of glitter. Mix black, orange, and purple for a festive look.
- Matte and Shiny: Experiment with matte bases paired with glossy designs. For instance, a matte black base with shiny spider designs can create a captivating contrast.
Creative Techniques
Using different techniques will enhance your nail art. Try these options:
- Ombre Effect: Blend colors like orange and black for a stunning ombre effect. This method adds depth to your nail design.
- Negative Space: Use negative space effectively for a modern take. For example, paint half of your nail black and leave the rest clear, creating various shapes.
When you choose acrylic nails, the opportunities for designs are endless. If you need some professional guidance, or want to see exemplary designs, check out websites like The Cut or Nail Art Gallery for more inspiration and tutorials.
Tips for Maintaining Your Acrylic Halloween Nails
Once you have your Halloween nails designed, maintaining their beauty is essential. Here are a few tips:
- Moisturize: Keep your cuticles and skin around nails moisturized to avoid peeling and cracking.
- Gentle Cleaning: Use a gentle cleanser to clean your nails. Avoid harsh chemicals that may break down the acrylic.
- Regular Touch-Ups: Schedule regular appointments with your nail technician to keep your designs fresh.
There you have it! Creative acrylic Halloween nail designs can bring life to your Halloween look. Be sure to have fun and express your personality with your nail art. This spooky season, step out in style with nails that truly represent Halloween spirit!
Trends and Color Palettes for Halloween Nail Art
Halloween is a time of the year that invites creativity and imagination, especially when it comes to nail art. As spooky season approaches, you might be looking for the hottest trends and color palettes to enhance your Halloween spirit. Whether you’re dressing up in a costume or simply want to celebrate the season, your nails can express festive flair. Let’s explore some thrilling trends and color palettes for Halloween nail art that will inspire you.
Current Trends in Halloween Nail Art
This year, several trends have emerged in Halloween nail art that you might want to try. These styles range from classic designs to modern interpretations, ensuring everyone finds something they love.
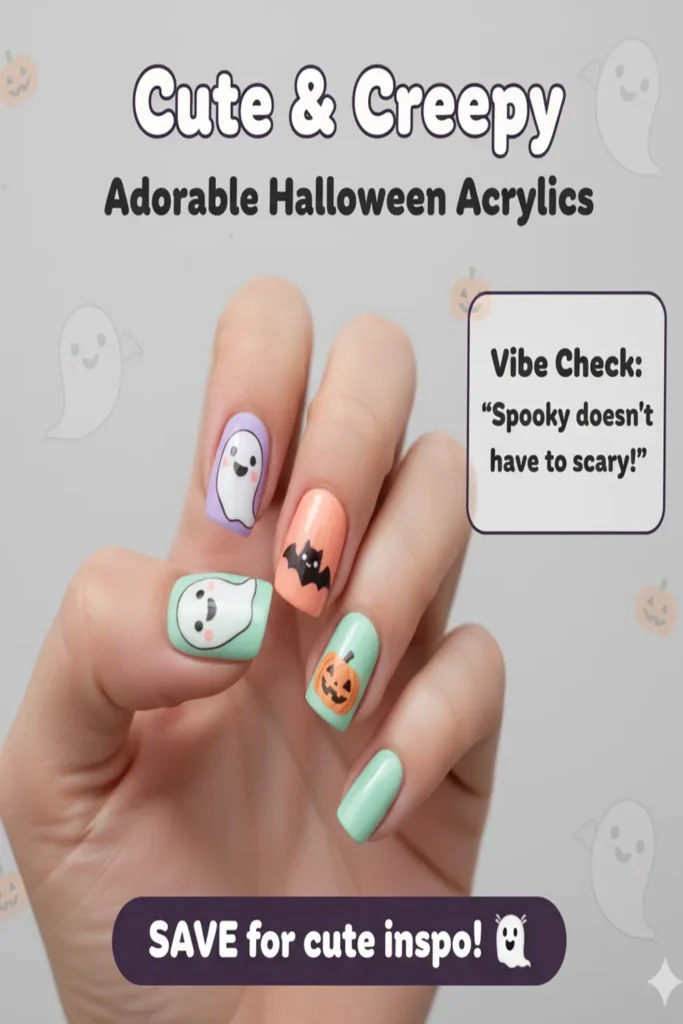
- Ghostly Designs: Minimalist ghost designs are all the rage. You can opt for white nails with tiny black ghost faces or vice versa. This simple yet adorable style captures the spooky spirit perfectly.
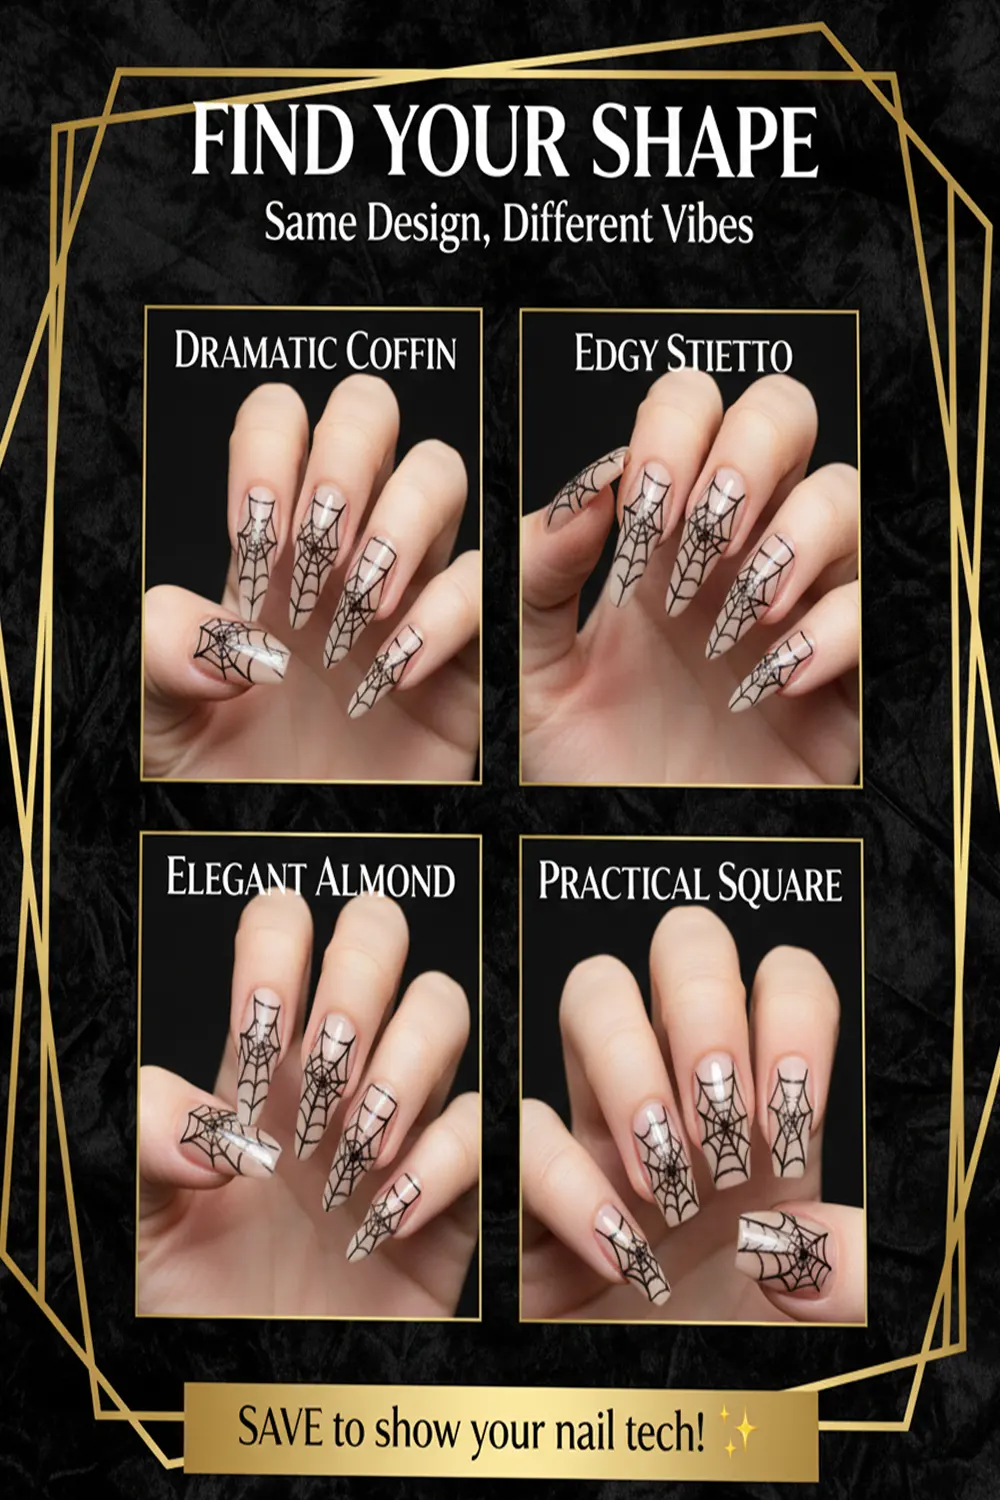
- Spider Webs: Intricate spider web patterns across an accent nail are both elegant and eerie. Using a fine brush or a nail tool can help you achieve this detailed design.
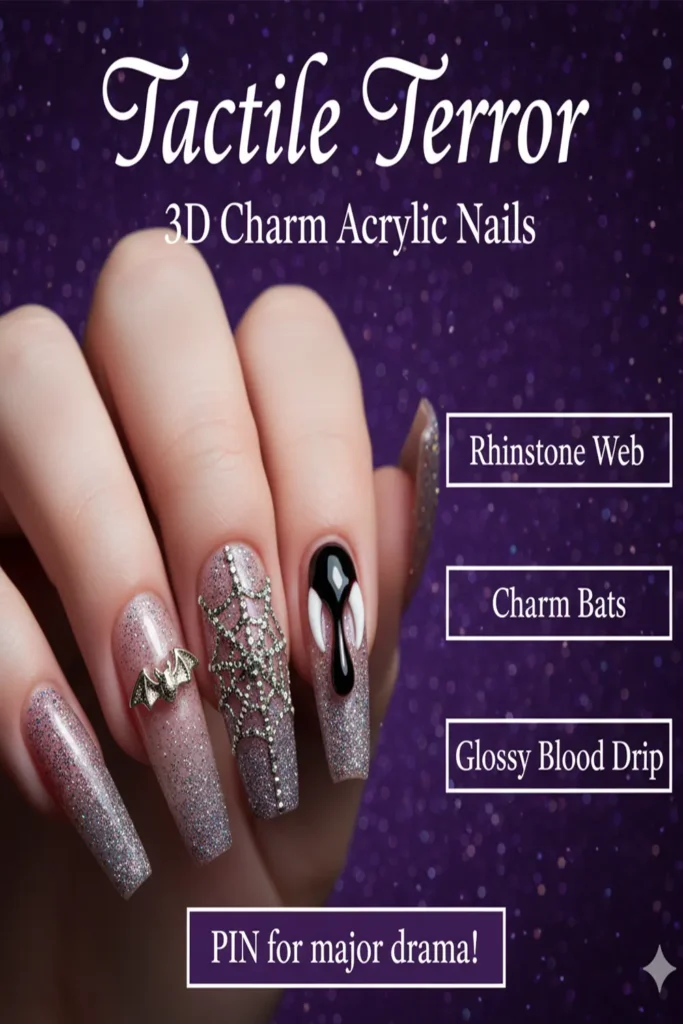
- Dripping Blood: The dripping blood effect is a dramatic look that never goes out of style. Pair deep red with black or white to create a striking contrast.
- Halloween Characters: Think pumpkins, witches, and bats! Integrating small, hand-painted characters adds a playful touch to your nails.
- Mix and Match: Don’t stick with just one design. Mixing and matching different Halloween themes, like combining ghosts with pumpkins, can yield stunning results.
Exciting Color Palettes for Halloween Nails
The color palette you choose can make a significant difference in the overall look of your Halloween nail art. Here are some vibrant color combinations to consider:
| Color Palette | Colors | Best Designs |
|---|---|---|
| Classic Halloween | Black, Orange, Purple | Jack-o’-lanterns, Bats, and Witch Hats |
| Chic Neutrals | Beige, Brown, Gold | Subtle Ghosts and Spider Webs |
| Gothic Glam | Deep Red, Black, Silver | Dripping Blood and Spooky Skulls |
| Pastel Halloween | Pastel Pink, Mint Green, Lavender | Cute Ghosts and Candy Corn |
| Metallic Magic | Gold, Silver, Bronze | Shiny Bats and Eerie Stars |
DIY Nail Art Techniques
Creating your Halloween nails can be a rewarding experience. Here are some popular techniques and tips to help you achieve your desired look:
- Stickers and Stencils: Use Halloween-themed stickers or stencils for quick and easy application. They can help create intricate designs without needing advanced skills.
- Freehand Painting: If you’re feeling artistic, try your hand at freehand painting. Use a fine brush for details and a dotting tool for polka dots and small features.
- Gradient Techniques: Creating an ombre effect can add depth to your nails. Blend colors like orange and yellow for a candy corn look or black and purple for a haunting effect.
For more inspiration and tutorials, check out resources like Nail Art Designs and OPI. These sites offer a treasure trove of ideas and professional techniques that can help you create the perfect Halloween nail art.
Halloween presents the perfect opportunity to express yourself through nail art. Whether you prefer charming and cute or dark and eerie designs, there are endless possibilities. Experiment with trends, play with color palettes, and most importantly, have fun with your Halloween nail art. Happy haunting!
Step-by-Step Guide to Achieving Stunning Acrylic Nails
Acrylic nails are a popular choice for those looking to enhance their nail game. They offer versatility, durability, and a stunning appearance. Whether you are new to acrylics or looking to perfect your technique, follow this step-by-step guide to achieve beautiful acrylic nails at home.
Gathering Your Supplies
Before you start the process, make sure you have all the necessary materials:
- Acrylic nail kit (powder and liquid)
- Nail tips or forms
- Nail file and buffer
- Nail glue
- Dappen dish
- Brush for acrylic application
- Top coat and base coat
- Cuticle pusher or stick
- Wipes or lint-free pads
Preparing Your Natural Nails
Start by prepping your natural nails to ensure the acrylic adheres well:
- Remove any old nail polish using an acetone-free remover.
- Gently push back your cuticles with a cuticle pusher to create a clean surface.
- Buff the surface of your nails lightly to remove shine, which promotes better adhesion.
Applying Nail Tips or Forms
You can choose to use nail tips or forms depending on the length and shape you desire.
- If using nail tips, select a size that fits your natural nail. Apply a small amount of nail glue and attach the tip, holding it in place for a few seconds to secure it.
- If using forms, apply the form underneath your natural nail, ensuring it fits snugly against your finger.
Mixing the Acrylic
It’s crucial to mix the acrylic powder and liquid correctly:
- Pour a small amount of acrylic liquid into a dappen dish.
- Dip your brush into the liquid, then into the acrylic powder to create a bead. The ideal size should be slightly larger than a pea.
Applying the Acrylic
Now, you are ready to apply the acrylic:
- Start with a small bead of acrylic and place it at the cuticle area of the nail. Gently blend it down towards the tip.
- Add more beads as necessary, working from the cuticle to the tip, allowing each layer to dry slightly before adding more.
- Use your brush to shape the acrylic, making sure to create an even surface.
Shaping and Buffing
After the acrylic has dried completely, it’s time to shape your nails:
- Use a nail file to shape the tips according to your desired style – whether it’s square, oval, or stiletto.
- Buff the surface using a finer file to smooth out bumps and create a polished finish.
Finishing Touches
Once your acrylic nails are shaped, you can apply color and top coat:
- Choose a nail polish in your desired shade and apply it evenly over the nails.
- Finish with a clear top coat to add shine and protection.
Maintenance Tips
To keep your acrylic nails looking their best, follow these maintenance tips:
- Avoid using your nails as tools to prevent lifting.
- Moisturize your cuticles regularly to keep them healthy.
- Schedule regular fills to maintain the look as your natural nails grow.
For more detailed tutorials and supplies, visit Nailpro or Nail Art Designs. These resources can help you further enhance your acrylic nail skills and provide inspiration for your next design.
The Best Accessories and Tools for Halloween Nail Art
Creating stunning Halloween nail art is part of the fun that comes with the spooky season. With the right accessories and tools, you can elevate your Halloween nail designs from simple to spectacular. Here are some must-have items to help you get started with your eerie and enchanting creations.
Essential Nail Tools
When it comes to Halloween nail art, having quality tools makes a significant difference. Here are the essential tools you should consider:
- Nail Brushes: Fine detail brushes are perfect for intricate designs like cobwebs and ghosts.
- Dotting Tools: These are great for making polka dots, eyes, or any round shapes on your nails.
- Nail File and Buffer: Smooth and shape your nails for a polished look.
- Cuticle Pusher: Keep your cuticles neat for a clean nail canvas.
- Nail Art Palette: A palette is ideal for mixing colors and customizing your nail art designs.
Nail Polish Collection
The foundation of any nail art begins with quality nail polish. For Halloween-themed designs, consider these color staples:
| Color | Use |
|---|---|
| Black | Perfect for silhouettes and spooky designs. |
| Orange | A classic Halloween color for pumpkins and autumn themes. |
| Purple | Great for witches, ghosts, and supernatural themes. |
| Green | Use for slime, monsters, or spooky accents. |
| Red | Ideal for blood or dramatic Halloween effects. |
Fun Accessories for Halloween Nail Art
To take your Halloween nail designs to the next level, consider incorporating these fun accessories:
- Nail Stickers: Quick and easy, Halloween-themed stickers can provide an instant design.
- Nail Gems and Rhinestones: Add a touch of glamour with spooky accents.
- Nail Tape: Use tape to create geometric designs and lines in your nail art.
- Glitter: Sprinkle some sparkle to mimic the magic of Halloween.
- Stencils: Use stencils for defined shapes such as bats, moons, and skulls.
Special Effects
For those looking to add a unique touch to their Halloween nail art, special effects products are essential:
- Matte Top Coat: Give your nails a matte finish for a spooky look.
- Foils: Gold and silver foils can create an eye-catching design reminiscent of witch’s gold.
- Chrome Powder: Achieve a mirror-like finish with chrome powder to make your design pop.
- Peel-off Base Coat: Makes removing intricate designs a breeze!
Where to Shop for Halloween Nail Art Tools
Finding the right tools and accessories can be made easy with a few online retailers known for their nail art supplies. Check out these stores:
- Nail Art USA – Great for sourcing various nail art tools and accessories.
- Salon Hive – Offers a wide range of nail polish options and nail art tools.
- Essie – Known for high-quality nail polish in seasonal colors.
With these tools and accessories, you can unleash your creativity and craft stunning Halloween nail art. Whether it’s spooky ghosts, jack-o’-lanterns, or glittery bats, the possibilities are endless when equipped with the right supplies.
How to Care for Your Acrylic Halloween Nails for Longevity
Your acrylic Halloween nails are a stunning way to embrace the spooky spirit of the season. To ensure these eye-catching nails stay vibrant and intact throughout your Halloween festivities, proper care is essential. Here are some practical tips to help you maintain your acrylic nails and extend their longevity, ensuring you can enjoy your Halloween designs to the fullest.
Keep Them Clean
Cleaning is one of the best ways to ensure the longevity of your acrylic nails. Make sure to wash your hands regularly, especially after handling any food or participating in activities that might cause grime buildup.
- Use a mild soap to wash your hands, gently scrubbing without being abrasive.
- Dry your hands thoroughly, avoiding the use of rough towels that could scratch the surface of your nails.
- Consider applying a gentle antibacterial wipe to your nails occasionally for added cleanliness.
Avoid Harsh Chemicals
Acrylic nails are durable, but exposure to harsh chemicals can weaken their structure and design. Here’s how to protect them:
- Always wear gloves when cleaning with powerful household cleaners or doing dishes.
- Be cautious with nail polish removers that contain acetone, as they can cause your acrylics to lift.
- Opt for natural or organic cleaning products when possible.
Moisturize Regularly
Keeping your cuticles and skin around your nails moisturized is crucial. This not only maintains a healthy appearance but also helps prevent lifting and damage. Consider using:
- A nourishing cuticle oil to keep the skin hydrated.
- Hand creams that contain essential oils to maintain overall moisture.
Limit Exposure to Water
While it’s essential to keep your hands clean, prolonged exposure to water can weaken acrylic nails. Here’s what you can do:
- Try to limit your nail exposure during prolonged soaking, such as baths and long showers.
- After washing dishes, ensure to dry your nails thoroughly.
Be Gentle with Your Nails
Be mindful of how you treat your acrylics. Avoid using your nails as tools. Here are some common tasks to be cautious of:
- Opening cans, packages, or using your nails to scratch surfaces can lead to cracks or breaks.
- Avoid excessive tapping or drumming on surfaces.
Choose a Quality Base and Top Coat
Using high-quality products is fundamental for protecting your acrylics. Make sure to select:
- A durable base coat designed for acrylic nails to strengthen the bond.
- A top coat that adds shine and offers protection against chipping.
Schedule Regular Fills
As your natural nails grow, it’s crucial to schedule regular fills to maintain the perfection of your acrylics. Typically, every 2-3 weeks is recommended, but this can vary depending on the speed of your nail growth.
Retouch Any Lifting Immediately
If you notice any lifting, have it retouched as soon as possible. Lifting can allow moisture and debris to get underneath, leading to potential infection. Prompt action is vital!
Enjoy Halloween Troubleshoot: In Case of Damage
Despite your best efforts, things can happen. If you do experience damage, here are some quick fixes:
- If a nail breaks, refrain from biting it or picking at it. Instead, visit your nail technician for repairs.
- For small scratches or chips, applying a clear polish can help temporarily conceal them.
Remember to celebrate your Halloween spirit with confidence and style while ensuring your acrylic nails shine brightly. For more information and expert tips on nail care, visit Nailpro and Cosmopolitan. With proper care, your acrylic Halloween nails will be the perfect accessory to your spooky celebrations!
Key Takeaway:
As Halloween approaches, there’s no better way to showcase your festive spirit than with creative acrylic Halloween nails. This year, you can unleash your inner artist by trying out various creative acrylic nail designs that highlight the spooky season. From classic Halloween motifs like pumpkins, ghosts, and cobwebs, to more intricate designs like galaxy nails with a Halloween twist, there are endless possibilities to express your creativity. You can mix and match elements to create a unique look that fits your style or mood.
When it comes to trends and color palettes, darker shades such as deep purple, jet black, and burnt orange dominate the scene, along with metallic accents for an added touch of glam. Pastel colors are also making a statement this year, particularly shades like eerie mint and soft lavender, which can offer a whimsical contrast to traditional Halloween palettes. These colors combined with trendy nail shapes—like coffin or stiletto—can take your Halloween nail art to the next level.
Creating stunning acrylic nails is not just about the design; knowing how to achieve the look is equally important. A step-by-step guide can simplify the process, ensuring you have all the essentials, from the right acrylic powder and liquid to nail forms or tips. Understanding the technique will help you achieve the perfect shape and finish, making your Halloween acrylic nails the talk of the town.
To enhance your designs, invest in the best accessories and tools. Nail stickers, glitter, and special effect powders can elevate your designs further while making the application process enjoyable. Having the right tools, such as nail brushes and dotting tools, can help you achieve detailed designs seamlessly.
Caring for your acrylic Halloween nails is crucial for maintaining their beauty and longevity. Simple practices, such as using cuticle oil and avoiding harsh chemicals, can help keep your nails looking fresh throughout the season. By following these essential tips and leveraging your creative spirit, you’ll not only show off beautiful acrylic Halloween nails but make a statement that captures the essence of the season.
Conclusion
As the Halloween season approaches, there’s no better way to show off your spooky spirit than with creative acrylic Halloween nails. With a myriad of designs ranging from ghoulish ghosts to festive pumpkins, the possibilities are nearly endless. This year, don’t shy away from vibrant color palettes that reflect autumn’s beauty. Incorporate rich oranges, deep purples, and striking blacks to create eye-catching nail art that turns heads.
Achieving stunning acrylic nails doesn’t have to be a daunting task. By following a step-by-step guide, even beginners can master the art of acrylic application and nail design. Equipping yourself with the best tools and accessories can elevate your creativity and precision, ensuring your Halloween nails are nothing short of spectacular.
Once you’ve achieved your dream nail designs, proper care becomes key to maintaining their beauty. Regular maintenance and attention will keep your acrylic nails looking fresh and vibrant throughout the spookiest month of the year. By following the right care tips, you can enjoy your Halloween-themed nails longer, making them a highlight of all your Halloween celebrations.
This Halloween, let your creativity shine through your nails. Whether you prefer designs that lean toward the chic and understated or the wild and whimsical, embracing acrylic nails is a fun way to express your holiday spirit. So gather your tools, unleash your imagination, and get ready to flaunt your unique Halloween nail art!