Halloween is an exciting time full of creativity, fun, and of course, a great chance to express your style. One of the most playful ways to celebrate is through cute simple Halloween nails. Whether you’re going to a party or just want to embrace the spirit of the spooky season, having adorable nail art can enhance your festive look. Here are some creative ideas that are easy to do but will make your nails stand out.
First, consider using classic Halloween colors like black, orange, and purple. These hues are not only festive but also versatile, allowing for countless designs. Here are some cute nail art ideas that you can easily achieve at home:
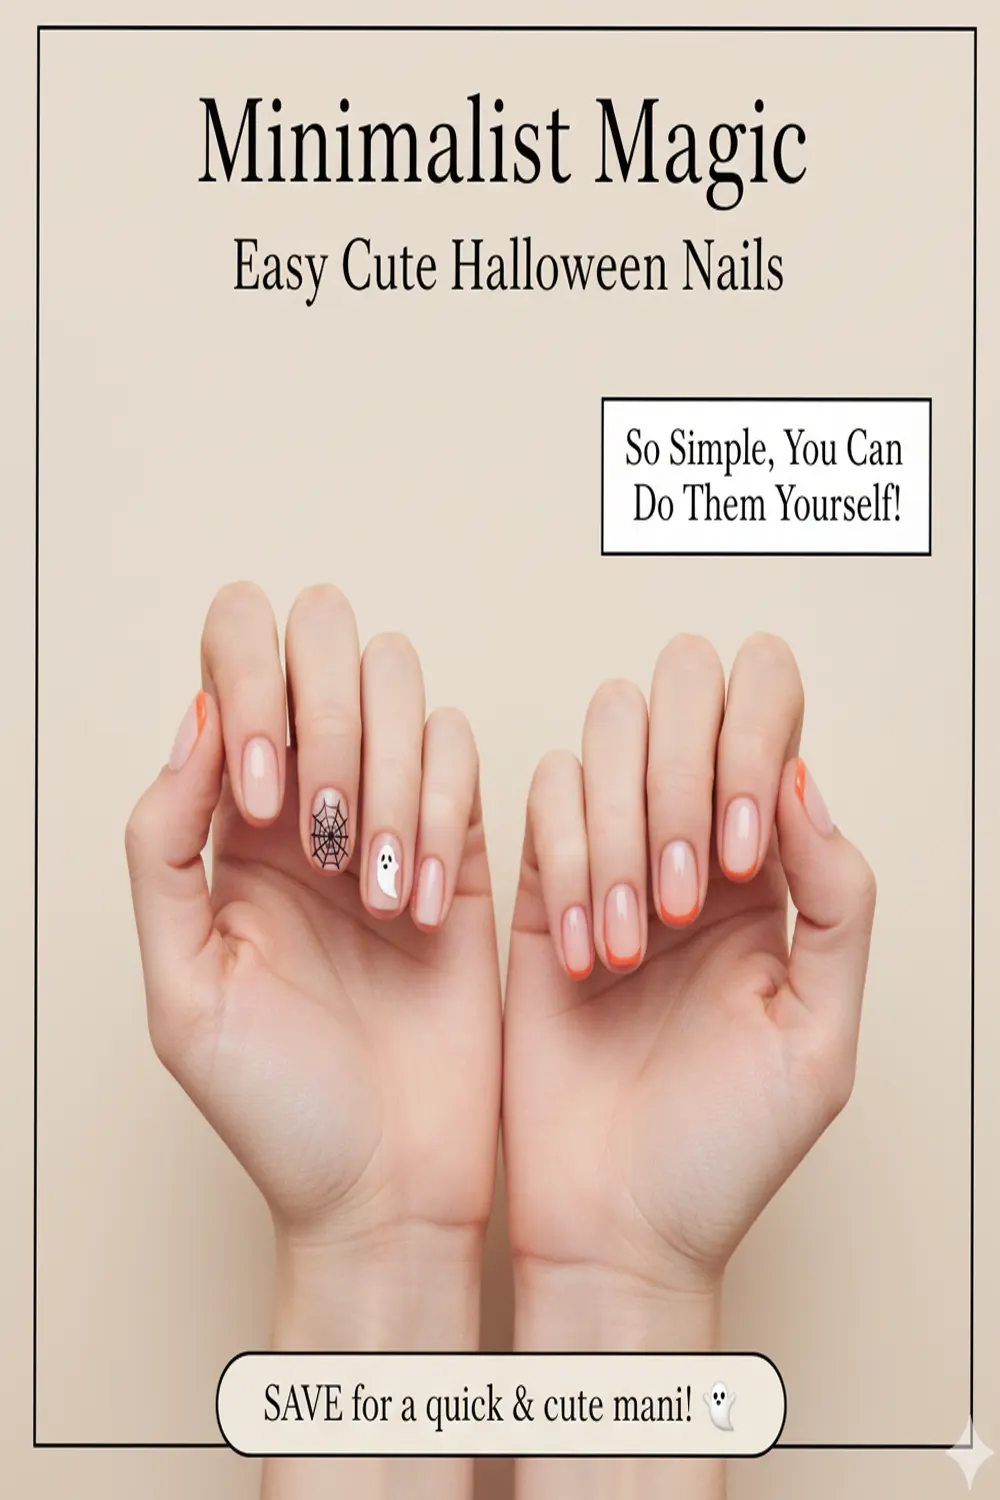
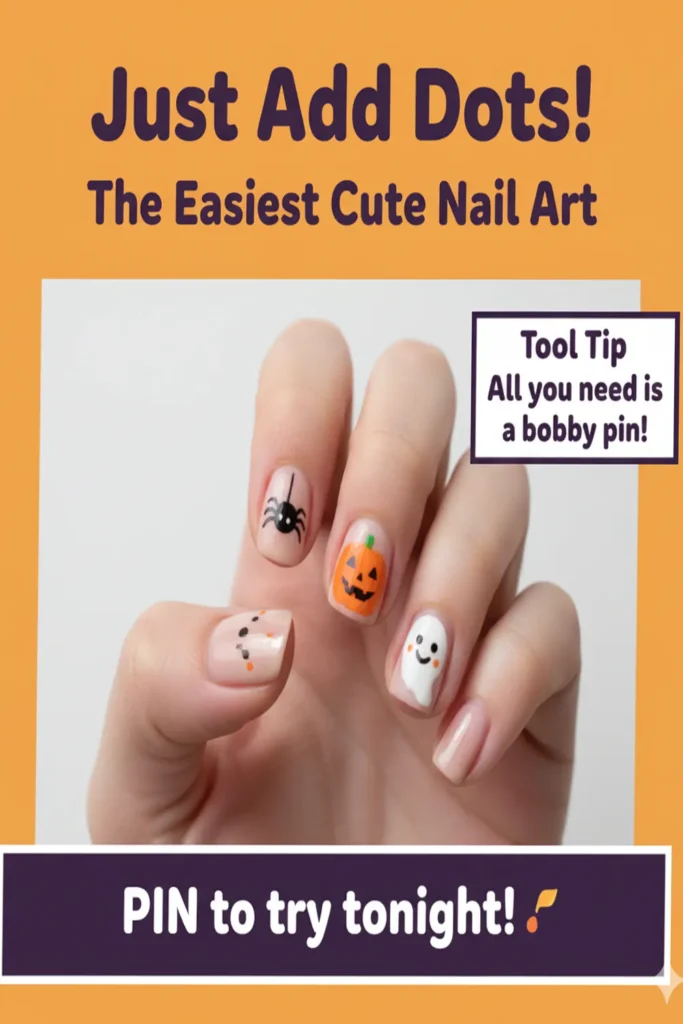
Ghostly White: Paint your nails white and use a black marker or paint to add little ghost faces. You can vary the expressions for extra cuteness!
Pumpkin Patch: A bright orange base coat with green vines drawn across your nails can create a pumpkin patch look. Add little black dots for added details.
Spider Webs: On a dark base, use a white striper to draw spider webs. Place a tiny black spider in one corner for extra charm.
Ooze and Boo: A beautiful slime green base topped with googly eyes or little witch hats can be both spooky and adorable.
Candy Corn Delight: Use three stripes of yellow, orange, and white to mimic candy corn. This simple design is not only cute but reminds everyone of the Halloween treats!
To nail the perfect Halloween manicure, consider the following essential tools and products:
Product
Purpose
Nail Tools Set
For shaping and cleaning nails
Base Coat
Protects your nails and enhances color
Top Coat
Seals your designs to make them last longer
Nail Art Pens
For detailed designs and drawing
After preparing your nails with these tools, let’s talk about some more ideas that add a unique touch to your Halloween nail design:
Abstract Monsters: Use various colors to create abstract shapes resembling monsters. Add tiny eyes and quirky mouths to make them more fun.
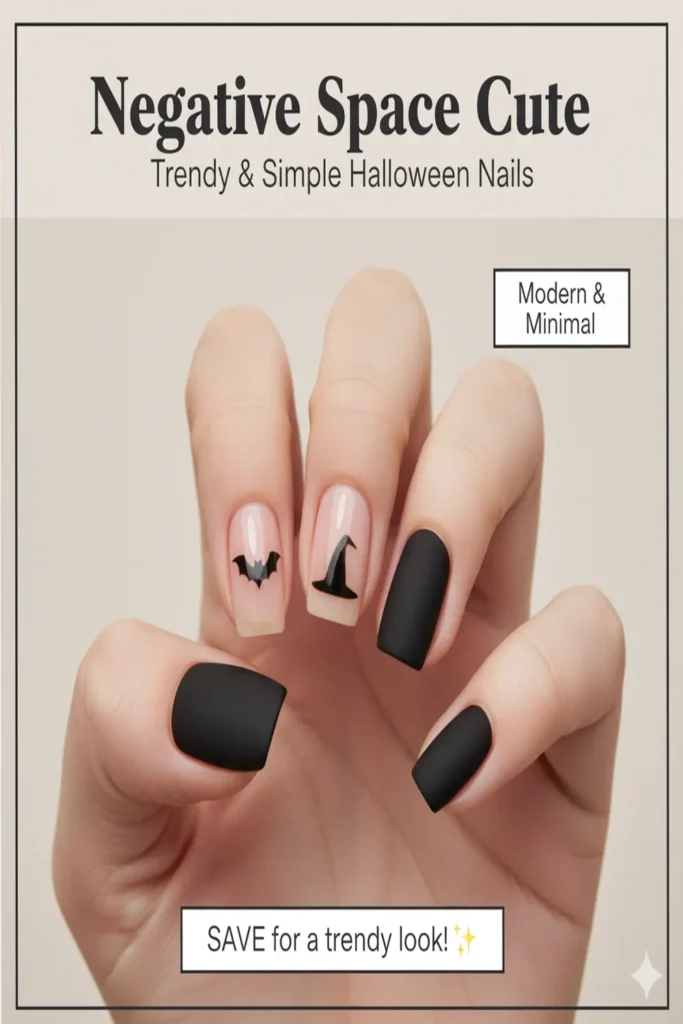
Friendly Bats: Paint a dark blue or black background and use a nail art brush to create little bat silhouettes hanging upside down.
Witch’s Brew: Use a shimmering green polish and adorn your nails with tiny witch hats and broomsticks using nail stickers or paint.
Frankenstein’s Fingers: Base your nails with a bright green and paint little black stitches or lightning bolts to mimic Frankenstein’s monster.
If you’re looking for tutorials and inspiration, websites like Nail Art Gallery offer a wealth of ideas and step-by-step guides. Popular platforms such as Instagram also have trending hashtags where you can find thousands of creative Halloween nail designs to mimic.
When doing your nails, be sure to take your time. Experimenting with different colors and techniques can help you create the perfect festive look. Don’t be afraid to mix and match ideas to personalize your Halloween nails. The aim is to have fun and enjoy the process!
After you’ve completed your design, share your spooky creations with friends on social media or even wear them to your Halloween celebrations. Cute simple Halloween nails can be a great conversation starter and a way to show off your creativity.
Get ready to impress everyone with your nail art skills this Halloween season!
Step-by-Step Guide to Achieving Adorable Halloween Nail Designs
Getting ready for Halloween isn’t just about costumes and decorations; it’s also about having fun with your looks, especially your nails! This year, why not try out some cute and simple Halloween nail designs? They are perfect for any Halloween party or gathering and can be done easily at home. Follow this simple step-by-step guide to create adorable Halloween nail art.
Gather Your Supplies
To start your nail art journey, you’ll need to gather some basic supplies. Here’s a list of what you’ll need:
Nail polish in various colors (orange, black, purple, and white are great options)
Nail polish remover and cotton pads
Clear top coat
Nail art tools (dotting tools, brushes, or even a toothpick)
Small stickers or stencils (optional)
Preparing Your Nails
Before diving into your cute Halloween nail designs, you need to prepare your nails properly:
Start with clean nails. Remove any old nail polish with your remover.
Trim and file your nails to your desired shape.
Apply a base coat to protect your nails and help your design last longer.
Choosing Your Design
Now that your nails are ready, let’s explore some fun and simple Halloween designs you might want to try:
Design
Difficulty Level
Pumpkin Faces
Easy
Spider Webs
Medium
Ghosts
Easy
Bat Silhouettes
Medium
Haunted House
Hard
Step-by-Step Instructions for a Simple Pumpkin Face Design
The pumpkin face design is a classic and easy option that anyone can achieve. Here’s how to do it:
Paint your nails with an orange nail polish as the base color.
Once dry, use a black polish to create small triangles for the eyes and a jagged line for the mouth on a few fingers.
For added fun, you can use a dotting tool to make some green dots for leaves near the cuticle area.
Finish with a clear top coat to seal in your design.
Tips for Nail Art Success
Want your cute Halloween nails to shine even more? Here are some expert tips:
Practice: If you are new to nail art, practicing on paper first can help.
Take Your Time: Let each layer of polish dry completely before adding more detail.
Stay Creative: Don’t hesitate to mix and match designs! You can make one nail a pumpkin and another a ghost.
Resources for Nail Art Inspiration
If you’re looking for more inspiration, consider checking out additional online resources:
With a little creativity and these simple steps, you’ll have cute Halloween nails that are sure to impress! Whether you’re going for spooky or sweet, these designs will add the perfect touch to your Halloween fun. So grab your supplies, and let the nail art begin!
Essential Tools for Crafting Cute Halloween Nails at Home
Gearing up for Halloween can be a thrilling experience. One fun way to celebrate the season is by crafting cute Halloween nails right at home. With the right tools, you can design nails that showcase your creativity and holiday spirit. Here’s a rundown of the essential tools you’ll need to elevate your nail game this spooky season.
Nail Polish
The foundation of any nail art is, of course, nail polish. For Halloween, consider using colors that evoke the spirit of the season:
Black: Perfect for creating spooky designs.
Orange: A classic Halloween color.
Purple: Great for adding a touch of mystery.
White: Ideal for creating bone or ghostly nail designs.
Green: For those witchy vibes.
Opt for quality brands like Essie or OPI for vibrant colors that won’t chip easily.
Nail Tools
Having the right tools makes all the difference when crafting your cute Halloween nails. Here’s a list of must-have items:
Nail Files: A smooth edge is essential. Choose a fine grit to avoid damaging your nails.
Nail Clippers: Keeping your nails at a manageable length is key.
Cuticle Pushers: Helps prepare your nails for painting.
Dotting Tool: Perfect for creating small dots and intricate designs.
Nail Brushes: Use a fine detail brush for more complex designs.
You can find these tools at beauty supply stores or online at shops like Sally Beauty.
Accessories for Additional Flair
For a more festive touch, consider using accessories. Gemstones, stickers, and nail vinyls can easily take your Halloween nails up a notch:
Stickers: Easy to apply and come in various spooky motifs from bats to pumpkins.
Rhinestones: Add a bit of sparkle to your design.
Nail Vinyls: These help create crisp lines and patterns. You can easily peel them off after painting.
Protecting your nail designs is crucial. Here’s why a base and a top coat is essential:
Base Coat: Prevents staining and helps polish adhere better.
Top Coat: Seals in your design and adds shine, making your nails look professionally done.
Brands like Seche offer reliable base and top coats that will keep your Halloween nails looking fresh longer.
Nail Art Books and Resources
If you’re looking for inspiration, consider picking up a nail art book or exploring online resources. Websites like Nails Magazine and Instagram are packed with creative ideas and tutorials that can guide you throughout your crafting journey.
Don’t underestimate the power of a little practice. Nail art can take time to master, but with patience and the right tools, your cute Halloween nails will make a statement this spooky season!
Your Halloween nails can be cute and creative with just a bit of time and effort. So gather your supplies and let your imagination run wild this Halloween season!
Popular Colors and Patterns for Simple Halloween Nail Art
As Halloween approaches, many people look for fun and creative ways to embrace the spooky spirit. Cute simple Halloween nails are a wonderful way to show off your festive side without going overboard. With an array of colors and patterns, you can find the perfect nail art that fits your personal style while keeping things simple.
Choosing the right colors is essential to set the Halloween mood. Here are some of the most popular shades to consider:
Classic Black: Black nails are timeless and can create a chic Halloween look. Paint them matte for a modern twist or add a glossy topcoat for a classic finish.
Spooky Orange: Orange is synonymous with Halloween. A vibrant orange not only brings the Halloween vibe but also pairs beautifully with black for nail art designs.
Ghostly White: White nails can give a ghost-like appearance. They are excellent for minimalist designs and can be the perfect base for spooky patterns.
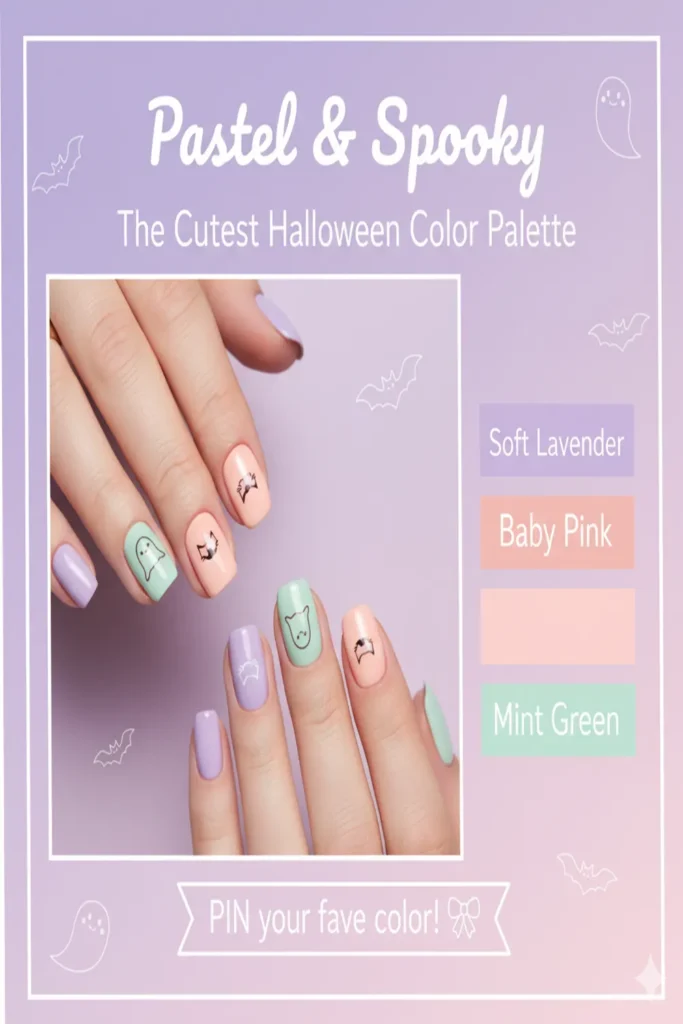
Deep Purple: Purple is a color often associated with magic and mystery. It makes for a unique Halloween nail design, especially when paired with glitter.
Haunting Green: Shades like lime green or dark forest green can add an eerie touch to your nails, reminiscent of witches and potions.
Not only do colors make a statement, but the patterns you choose can also elevate your Halloween nail art. Here are some cute and straightforward patterns you might love:
Polka Dots: Combine two or more colors for a fun and whimsical dot pattern. You can make black and orange polka dots for a classic Halloween look.
Stripes: Vertical or horizontal stripes in festive colors can give your nails a playful edge. Try alternating colors like purple and black for a striking effect.
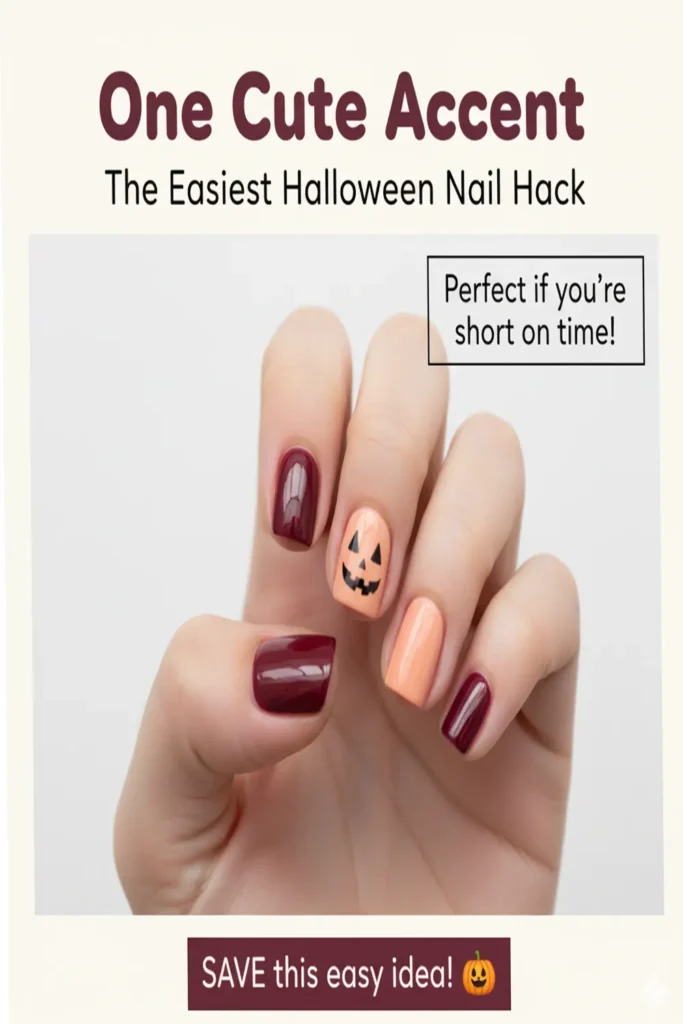
Jack-o’-Lantern Faces: For a cute twist, paint small jack-o’-lantern faces on a few accent nails. This adds a fun touch without being overwhelming.
Spider Webs: Use a thin brush or a nail art pen to create spider webs on a dark nail. A white or silver web stands out beautifully against black or purple backgrounds.
Ghost Faces: White ghost shapes with tiny black eyes can create an adorable and spooky look. Pair these with a gradient background for an extra layer of fun.
As you decide on your nail colors and patterns, you may wonder where to find inspiration and tutorials. Websites dedicated to nail art provide countless ideas. Check out sites like Nail Art Gallery and My Nail Art for creative tips and guides on how to achieve the cutest Halloween nail designs.
It can also be helpful to collect ideas and create a vision board of your favorite designs. This allows you to visualize how different colors and patterns would look together. Once you settle on your favorite designs, gather your nail supplies:
Item
Description
Nail Polish
Choose vibrant colors suitable for Halloween.
Nail Art Pens
Essential for fine details and patterns.
Top Coat
Provides shine and long-lasting finish.
Nail Tape
Helps create clean lines for patterns.
Dotting Tools
Perfect for creating dots and small designs.
Simple Halloween nails can be as elaborate or as minimalistic as you desire. Whether you choose cute designs with playful colors or opt for a chic black-and-white palette, your nails can be the perfect accessory for your Halloween celebrations. Keep it fun, and don’t be afraid to express your style through your nail art! With so many options available, the only limit is your creativity. So grab your nail kit, get inspired, and enjoy the spooky season with adorable nail art!
For more nail art tips and inspiration, visit Nail Art Design and discover trending designs you might want to try this Halloween!
Fun Tips for Maintaining Your Halloween Nails Throughout the Season
Halloween is a time for creativity, fun, and of course, cute simple Halloween nails that add a festive flair to your look. While these designs can be playful and eye-catching, it’s important to maintain them throughout the season. Here are some fun tips to keep your Halloween nail art looking fabulous all October long.
Choose Quality Products
Start your Halloween nail journey with high-quality nail polish. Invest in brands known for their durability and long-lasting formulas. Look for products that are chip-resistant and have a high-gloss finish. Some popular options include Essie and OPI, which offer a wide range of Halloween-themed colors.
Prep Your Nails
Before applying any nail polish, prepare your nails properly to ensure the longevity of your design. Here are a few steps to consider:
Remove any old polish using an acetone-free remover.
File and shape your nails to your desired length.
Push back your cuticles gently and moisturize them for a neat appearance.
Apply a base coat to protect your nails and prolong the wear of your nail art.
Seal the Deal with Top Coat
After you finish your cute nail art, apply a clear top coat. This helps seal the design, adds shine, and prevents chipping. Reapply the top coat every few days to maintain the look and protect against wear and tear. Brands like Seche Vite are great for quick-drying top coats that provide a durable finish.
Avoid Water and Chemicals
Water and harsh chemicals can damage your nail finishes. When doing dishes or cleaning, wear gloves to protect your cute Halloween nails. It’s a simple yet effective way to ensure they remain intact. If you’re out and about, be cautious with hand sanitizers and lotions that may wear down polish.
Practice Gentle Habits
Be mindful of how you use your hands. Avoid using your nails as tools for opening cans or boxes, as this can lead to chips and breaks. Instead, use the pads of your fingers to prevent any damage to your Halloween nail designs.
Regular Touch-Ups
Throughout the month, you may notice small chips or imperfections in your nail art. Keep a small bottle of your primary color with you for easy touch-ups on the go. This can save a cute Halloween look and keep your nails looking fresh every day. You can even carry nail polish remover wipes such as those from Nailtiques for quick fixes.
Protect Your Nails During Halloween Activities
Halloween activities can be a blast, but they can also put your nails at risk. If you are engaging in crafts or activities that involve glue or paints, remember to protect your nails. Consider using finger cots or simply donning gloves to prevent any messy situations from ruining your look.
Moisturize Regularly
Keep your cuticles and nails hydrated by using cuticle oil. This will not only help maintain the appearance of your Halloween nails but will also promote healthy nail growth. Brands like Burt’s Bees offer natural moisturizing options that keep your nails looking their best.
Nail Art Inspiration
Need inspiration for cute simple Halloween nails? Websites like Nail Design Code feature a collection of creative ideas that can help you get started on designing your spooky yet charming nails.
By following these fun tips, you can ensure that your cute simple Halloween nails stay vibrant and intact throughout the season. Embrace creativity and allow your personality to shine through in your nail designs, while keeping them perfectly maintained. Happy Halloween!
This article serves as your ultimate guide to achieving cute simple Halloween nails that are perfect for the festive season. From creative ideas to step-by-step instructions, you’ll discover how to make your nails a standout part of your Halloween look.
To begin with, we explored a variety of creative ideas for cute simple Halloween nails. Whether you prefer spooky ghosts, friendly pumpkins, or classic candy corn designs, there’s something for everyone. The focus here is on simplicity, ensuring that you can achieve stunning nail art without requiring advanced skills. Each idea serves as a jumping-off point, allowing you to personalize your designs to match your style.
The step-by-step guide offers clear and concise instructions that make the process approachable, even for beginners. It guides you through each design, providing insights into techniques that ensure your nails turn out adorable. This user-friendly approach encourages everyone to get involved in Halloween nail art, regardless of previous experience.
Essential tools are a vital part of achieving your Halloween nail goals. We listed the must-have items like base coat, top coat, nail polish in festive colors, and tools for nail art that can help you create those cute designs at home. With the right tools on hand, you’ll feel empowered to unleash your creativity and experiment with various designs.
Speaking of color, we discussed popular colors and patterns that resonate during this spooky season. Shades of orange, black, purple, and glitter accents can transform your nails into festive masterpieces. Patterns like stripes, polka dots, and subtle gradients add a fun twist to your nail art.
We included fun tips for maintaining your Halloween nails throughout the season. Regular touch-ups, moisturizing, and proper care will ensure that your delightful designs last longer while still looking great.
This comprehensive article equips you with everything you need to create cute simple Halloween nails, making it easy to embrace the Halloween spirit. With creativity, the right tools, and our helpful tips, you’ll be well on your way to a fabulous Halloween nail experience!
Conclusion
As you dive into the colorful world of cute simple Halloween nails, you’ll find that creativity truly knows no bounds. From playful ghost designs to enchanting pumpkin motifs, there’s a fun idea for every nail enthusiast. Following our step-by-step guide ensures that even beginners can achieve adorable looks that will impress friends at any Halloween gathering.
Equipping yourself with the right tools is essential for crafting flawless designs at home. With a few basic supplies, you can transform your nails into festive masterpieces without breaking the bank. Don’t shy away from using popular colors and patterns, such as classic black and orange or whimsical spiderweb designs, to really capture the Halloween spirit.
As the spooky season progresses, maintaining your Halloween nails becomes crucial. Simple tips such as applying a top coat and avoiding harsh chemicals can help keep your designs fresh and vibrant. Enjoy the process of experimenting with different designs, and don’t hesitate to switch things up as the holiday approaches.
By embracing creativity and using the right techniques, you can enjoy beautiful, fun nails that reflect the excitement of Halloween. Remember, it’s not just about the final look but also about expressing yourself and enjoying the festive spirit. So grab your nail tools, play with colors and patterns, and let your imagination run wild as you celebrate this spooky season with style!